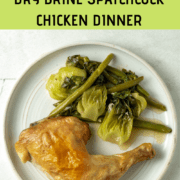
If you want an evenly cooked, juicy and flavorful whole roasted chicken, this is your best method. This dry brine spatchcock chicken dinner cooks faster than a traditional roasted chicken. The best part of this recipe is that you can cook the vegetables in the same sheet pan for a one pan dinner. Bonus, if you want extra deliciousness, make a gravy for the chicken!

Jump to:
Tips and Tricks
Do you have to dry brine the chicken? You don’t have to dry brine the chicken for this recipe to be successful. However, if you have the time and fridge space, I definitely recommend it. When you dry brine a chicken it results in a more evenly seasoned and juicier chicken. You’ll also get crispier chicken skin. I’ve definitely made roasted chickens without a dry brine and they are good but the dry brine makes it even better.
What can you do with leftover roasted chicken? There are a ton of different things you can do with already roasted chicken. A lot of times we’ll make chicken caesar salad wraps, make chicken enchiladas, buffalo chicken dip or chicken soup! Any place you usually have to cook the chicken first: you can use these leftovers.
How do you store leftovers? I take all the meat off the bone and save the bones in a separate container. Store the bones in the fridge for up to three days or freeze for up to six months. Store the leftover meat for up to three days in the fridge. The vegetables can also be stored with the meat if you plan to eat it together, for up to three days.
What can you do with leftover chicken bones? Leftover chicken bones are fantastic for making homemade chicken stock. Use the stock for different soups, sauces or just store it in the freezer for a rainy day. If you don’t have time to make chicken stock right away, save the bones in the freezer to make stock another day.
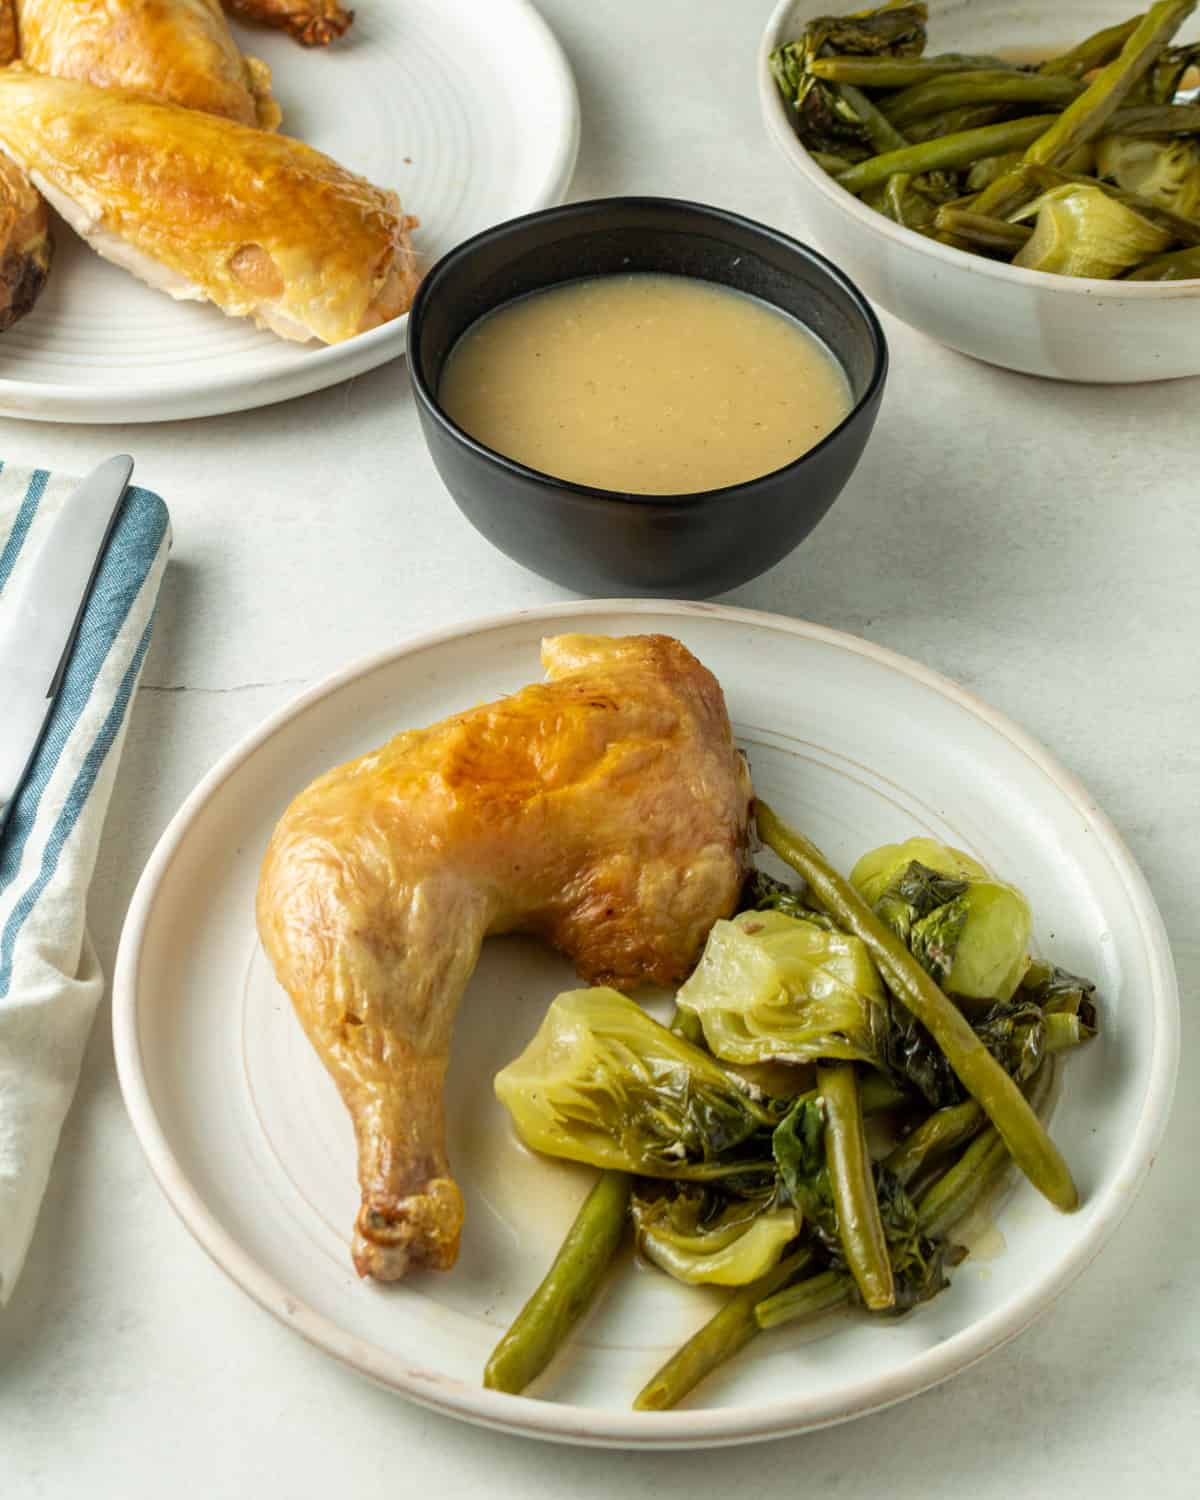
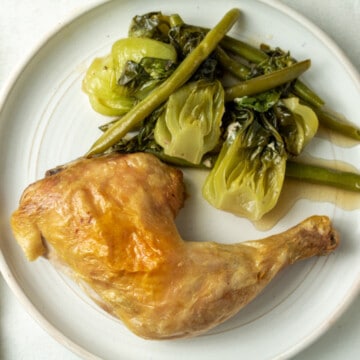
What do you serve with this roasted chicken dinner? I serve roasted chicken with the green beans and bok choy from the sheet tray. If you want to add starches, rice pilaf, mashed potatoes or stuffing are all great options. Any vegetable side dish will go great with roasted chicken because it’ll compliment the rich roasted chicken flavors.

How do you get a juicy and flavorful chicken? There are two main ways to ensure you get a juicy and flavorful chicken. One is the dry brine process, which helps to season all the meat and not just the skin or surface. This will help your chicken remain juicy and also be flavorful. The second way to make sure your chicken isn’t dry is to use a meat thermometer. I use an alarm meat thermometer so it takes the guesswork out of the process.You can also check the temperature periodically with an instant read thermometer (affliate link). It is important to check the temperature in both the breast and thigh as they cook at different rates. The chicken is done cooking when the breast reaches 155 F and the thigh reaches 175 F internally. If you’re wondering why I only cook my chicken to 155 F, check out this blog post from Thermoworks.
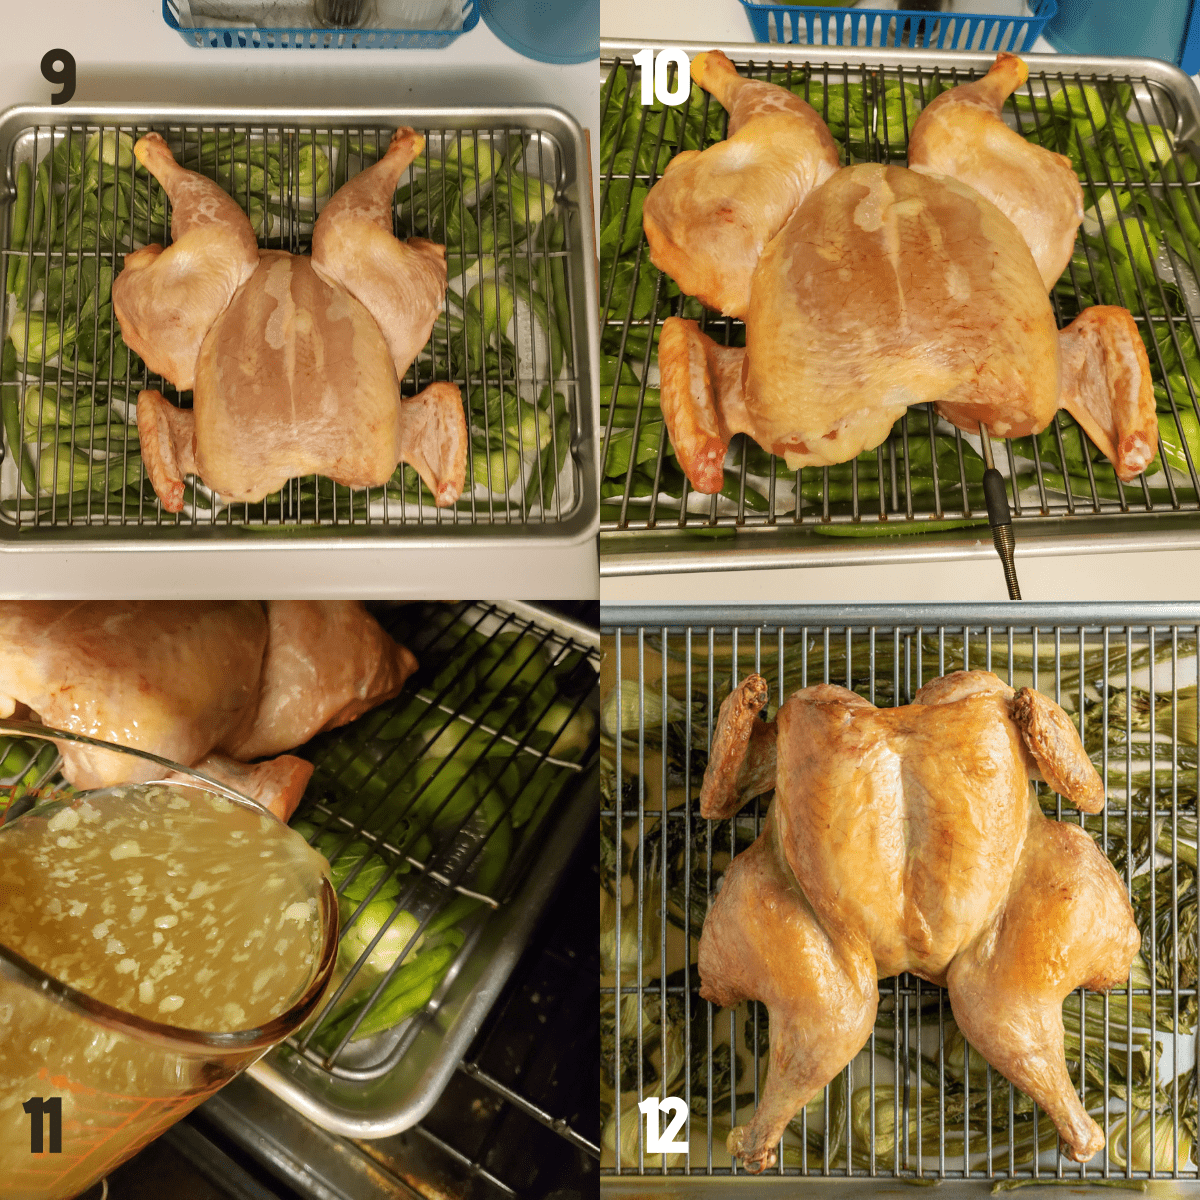
How do you clean baby bok choy? To clean baby bok choy, cut them lengthwise and then clean in water. Rinse them in water at least three times as they can be very sandy.
What is a dry brine? If you’re looking for an in depth explanation, you can check out the article from Serious Eats on the method. Essentially, it is salting the meat and allowing it to rest for a period of time, typically 24-48 hours depending on the cut of meat. It is called a dry brine because you don’t dissolve the salt in any liquid.
Ingredients
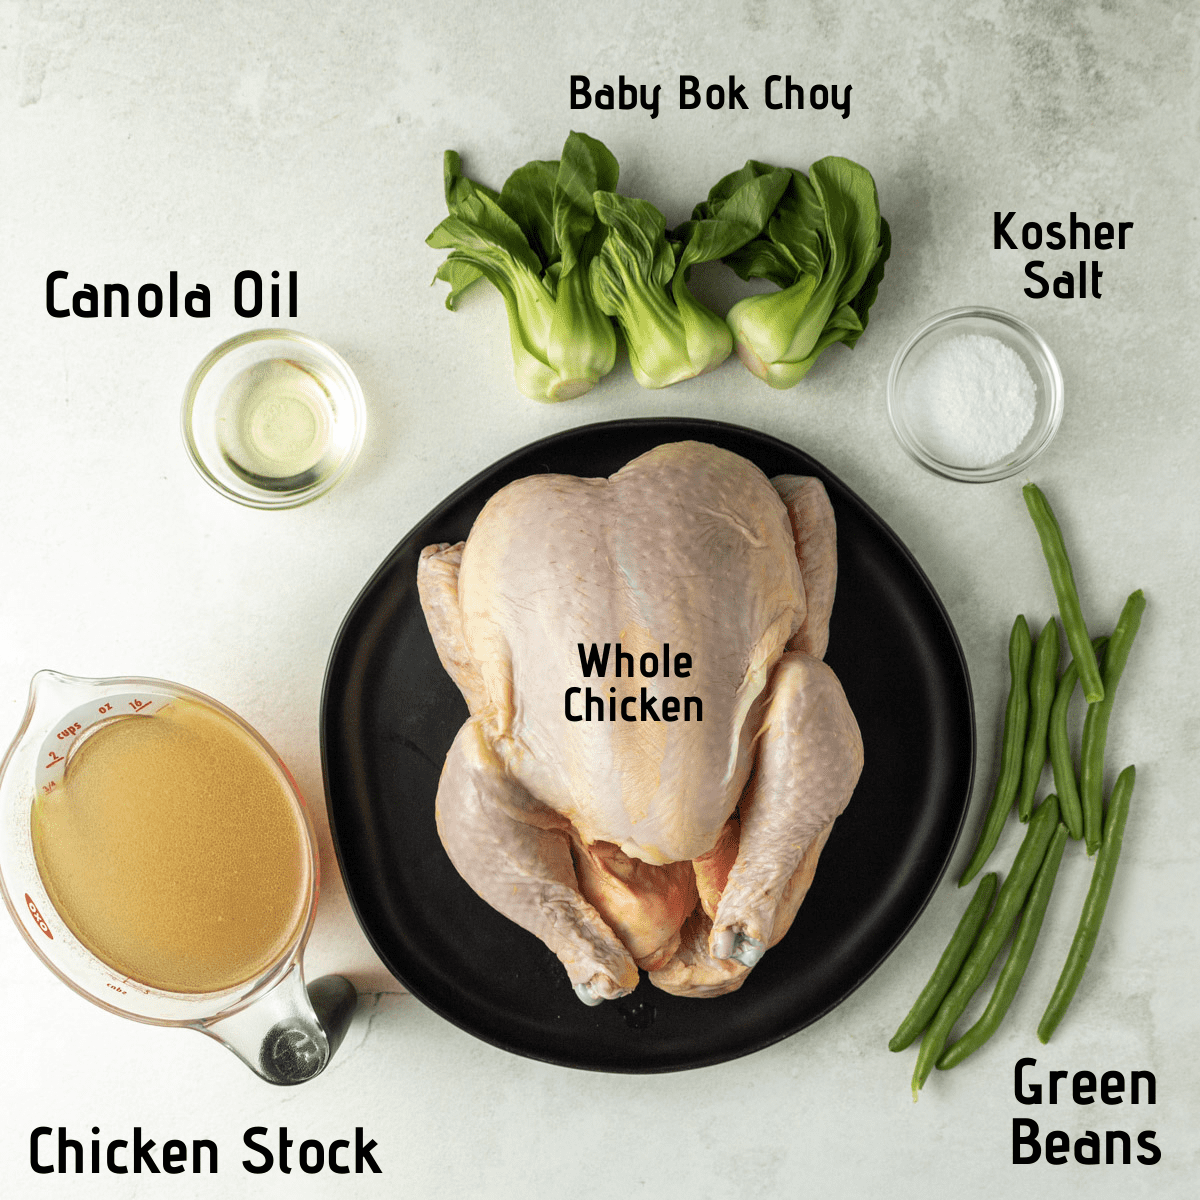
- Baby bok choy - a tender green similar to cabbage
- Diamond Crystal kosher salt - used for the dry brine
- Whole roasted chicken - 3-4 lbs is the size I used in this recipe, a larger one may take longer to cook
- Chicken stock - homemade or store bought works just fine
- Green beans - fresh, washed and trimmed

- Unsalted butter - for the roux
- Diamond Crystal kosher salt - for seasoning
- Garlic paste - or 2-3 grated cloves
- Chicken stock - homemade or store bought is fine
- All purpose flour - for the roux
- Black pepper - for seasoning
- Lemon - used for lemon juice to brighten the gravy
See recipe card for quantities.
What kind of salt should you use? I always use Diamond Crystal Kosher salt for all of my recipes unless otherwise stated. I used this salt because of the grain size, which is larger than table salt and Morton Kosher salt. Other salts can be harder to grab and it is easier to oversalt your food with them due to grain size. Not all salt is created equal but as long as you’re aware of the differences, you can use whatever you’ve got.
What is baby bok choy? Baby bok choy is the smaller version of bok choy which is a type of Chinese cabbage. This is a leafy cabbage vegetable that should be located in your produce section.
Method
Do you rinse the chicken at any point? I do not rinse my chicken before the salt or after the salt. When you’re doing a dry brine, salt the meat well but not too much (don’t pour two cups of salt over the chicken). I salt it generously according to my taste knowing that it will get absorbed. I know that “seasoning to taste” can be annoying but everyone has different preferences so what might be too salty for one person could be perfect for the next. The amount of salt used also depends on the size of the chicken and type of salt.
How long do you dry brine a chicken? Ideally, dry brine the chicken for at least four to six hours, overnight being ideal. You can dry brine for 24-48 hours.
Can you dry brine for too long? You can but I’m not completely sure of the upper limit on time. If you dry brine over 48 hours you may risk the texture of the meat changing in an unpleasant way.
Should you spatchcock a chicken before you begin brining? I find it easier to dry brine after I’ve spatchcocked the chicken. This allows the chicken to lay flat on the sheet tray and cooking rack and results in crispier skin in the end. It is also easier to get into the nooks and crannies of the thighs and legs.
Do you need to cover the chicken in the fridge? I recommend not covering the dry brining chicken in the fridge to allow the skin to dehydrate. The air in your fridge is very dry and will allow you to get crispy skin. Make sure you have enough room that nothing in the fridge is touching the raw chicken or the rack to avoid cross contamination. If you absolutely have to, you can cover the chicken loosely with tin foil.
Is a spatchcock chicken the same as a butterflied chicken? Yes! They are the same technique of cutting out the spine and flattening the chicken.
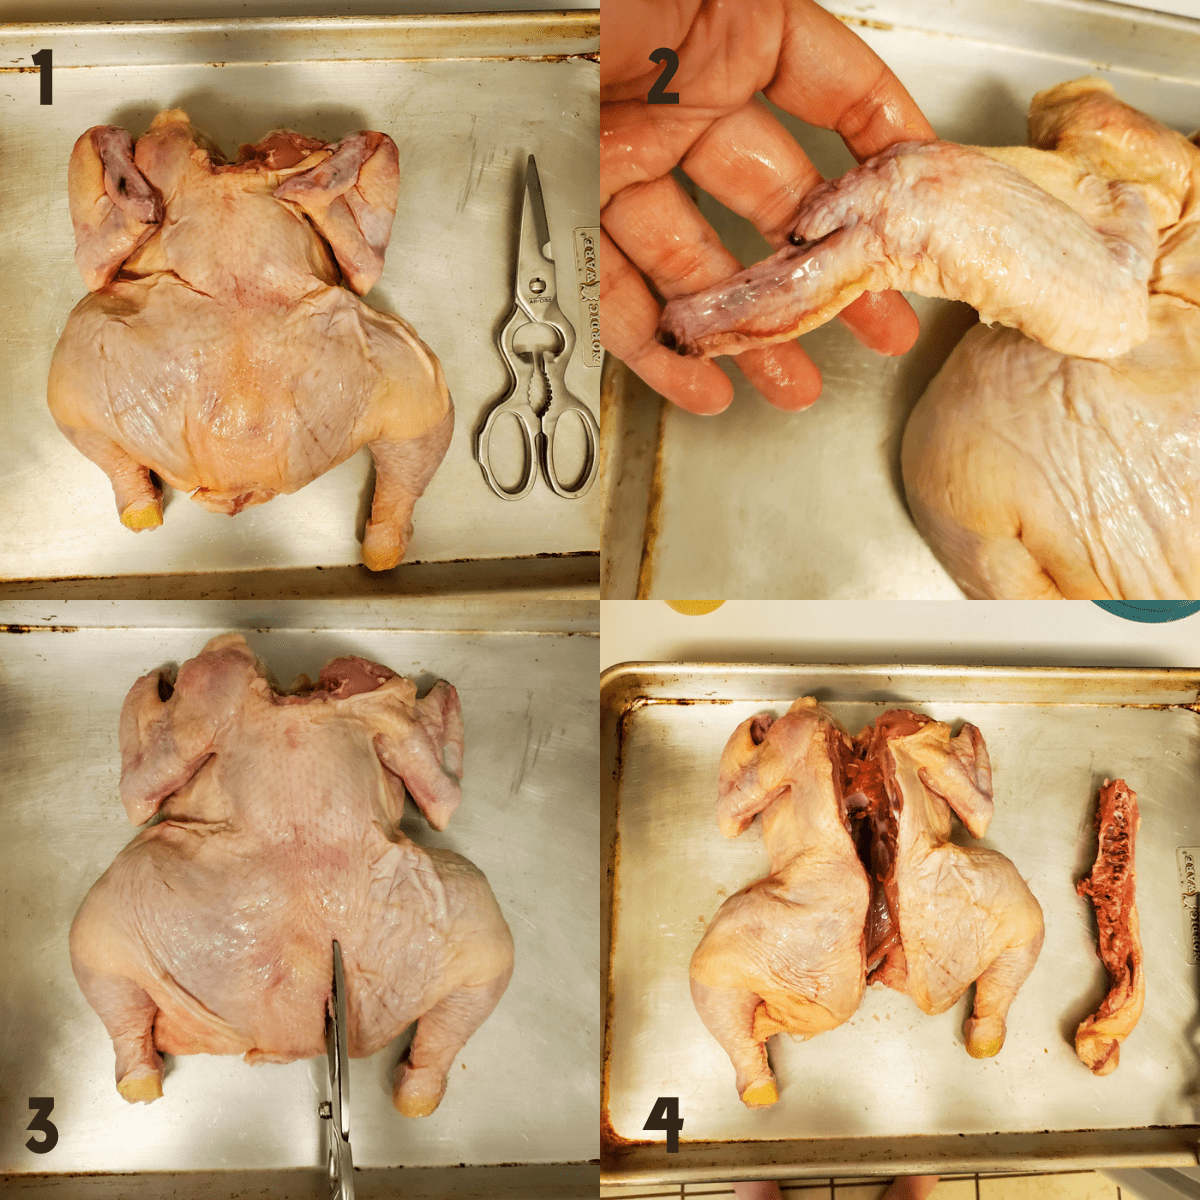
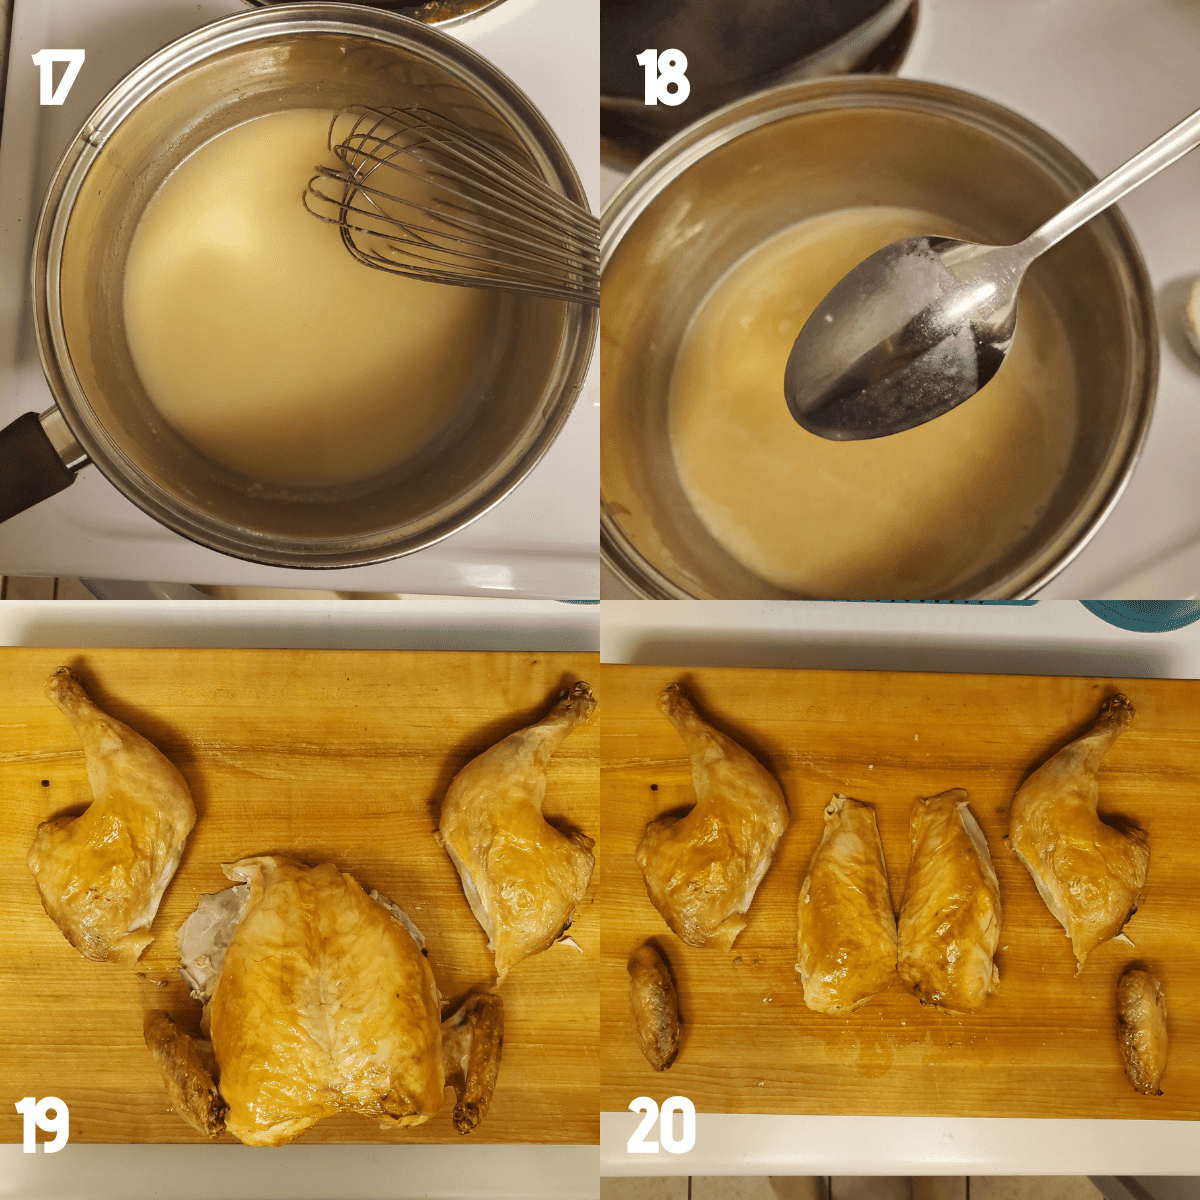
How do you spatchcock a chicken? The best tool to use to spatchcock a chicken is kitchen shears. Another option is to ask the butcher at your store to do it for you. To spatchcock a chicken you want to start with the breast on the bottom and the backbone facing you. Make one cut starting at the leg end on one side of the backbone. You’re going to cut through the ribcage but keep going toward the wings. Repeat on the other side of the spine until it’s removed. Save for stock! Now flip over the chicken so the breast is on top and push down until you feel or hear a crack, this breaks the breastbone and flattens the chicken.
How do you make this roasted chicken dinner?
Spatchcock and Dry Brine the Chicken
Spatchcock the chicken by removing the wingtips, and spine. Save these pieces for stock! Flip the chicken over so the breast is facing up and press down to flatten the chicken.
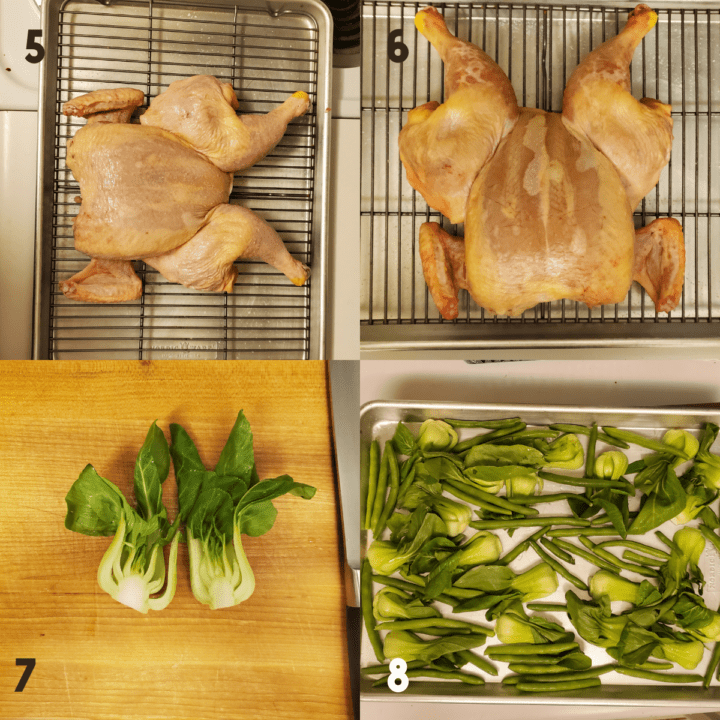
Loosen skin from meat using your fingers. Generously salt the entire chicken all over the meat and skin. Arrange the chicken so the breast is up and the legs and thighs are exposed on a cooking rack and sheet tray. Allow to sit in the fridge, uncovered for at least four hours, preferably overnight but up to 48 hours. If you don’t have time to allow it to dry brine, proceed as written below.
Roasting the Chicken and Vegetables
Preheat the oven to 450 F and place a rack in the middle of the oven. Cut all the baby bok choy in half lengthwise and add to a large mixing bowl. Trim all green beans and add to the same large mixing bowl. Add two teaspoons of canola oil to the vegetables, toss and lightly salt, set aside.
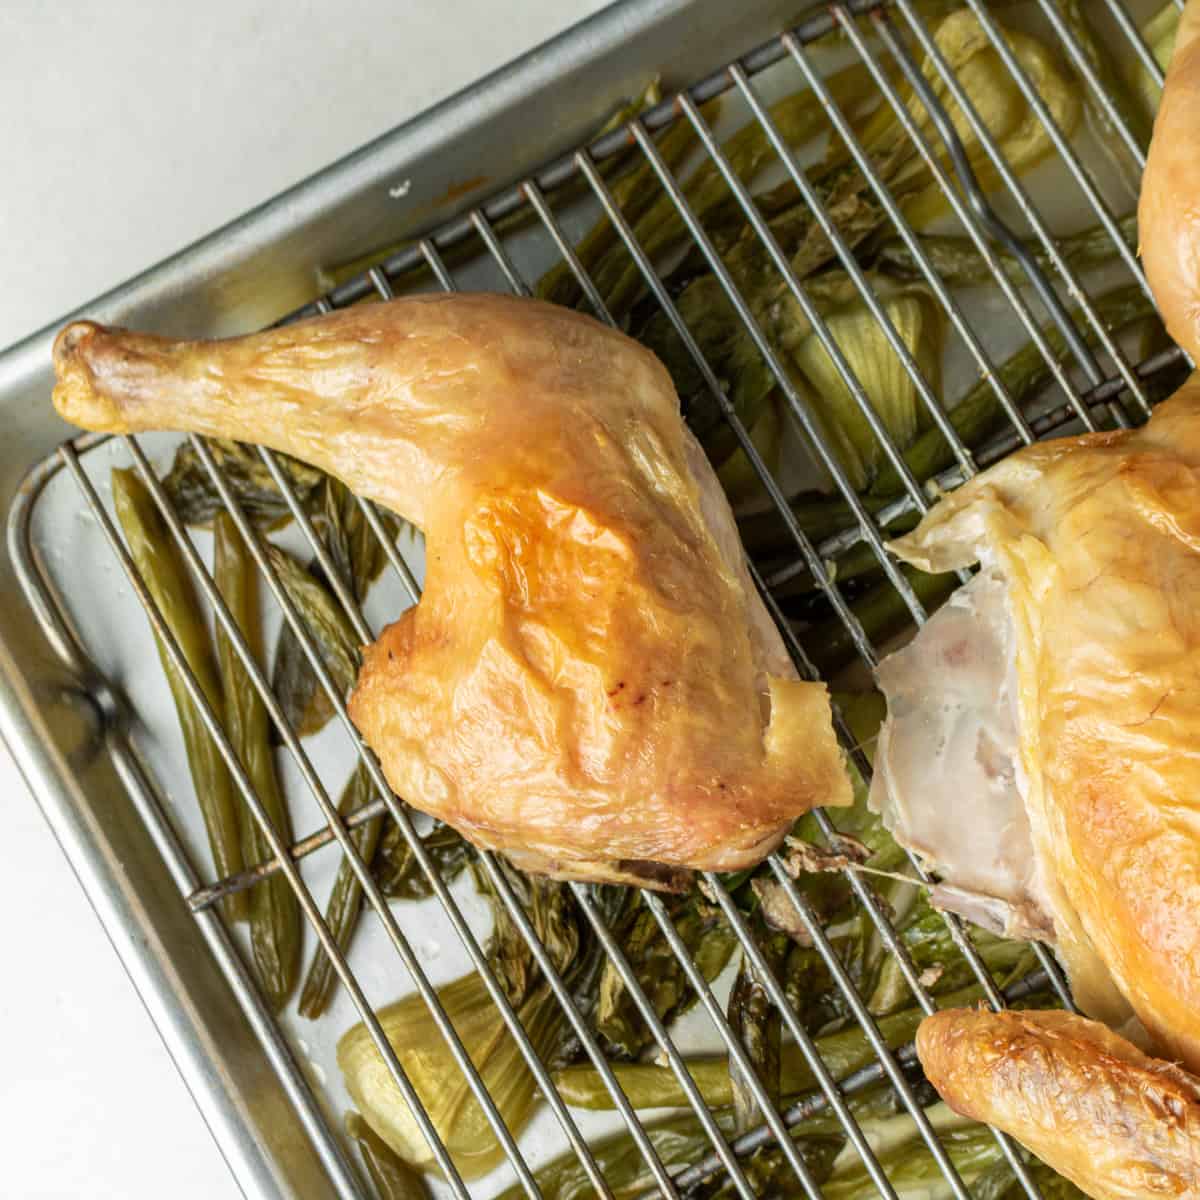
Take the chicken out of the fridge on the sheet tray and cooking rack. Remove the cooking rack and chicken from the sheet tray and set aside. Next, add the greens to the sheet tray that you used to dry brine the chicken in a single layer. Add the cooking rack and chicken on top of the vegetables so the chicken sits above the vegetables. Use the remaining canola oil and generously rub the chicken skin with it. Insert your alarm thermometer probe into the breast and set the temperature alarm to 155 F.
Place the entire sheet tray into the oven, with the thighs and legs toward the back. Carefully, add 1 ½ cups of chicken stock to the vegetables, just covering the bottom of the tray and cook for 25 minutes. Add ½ cup of the chicken stock if it has evaporated. Cook the chicken until the alarm sounds or for about 15-20 minutes more. Check the internal temperature for the breast to be around 155 F and the thighs to be about 175 F. The skin should be crispy and brown. The vegetables should be tender and most of the chicken stock should be evaporated. Allow the chicken to rest for at least 10 minutes after it has finished cooking before carving.
How do you make the gravy for this recipe? In a medium saucepan, over medium low heat, melt the butter until foamy. Add in garlic and cook for 30 seconds to one minute until fragrant.
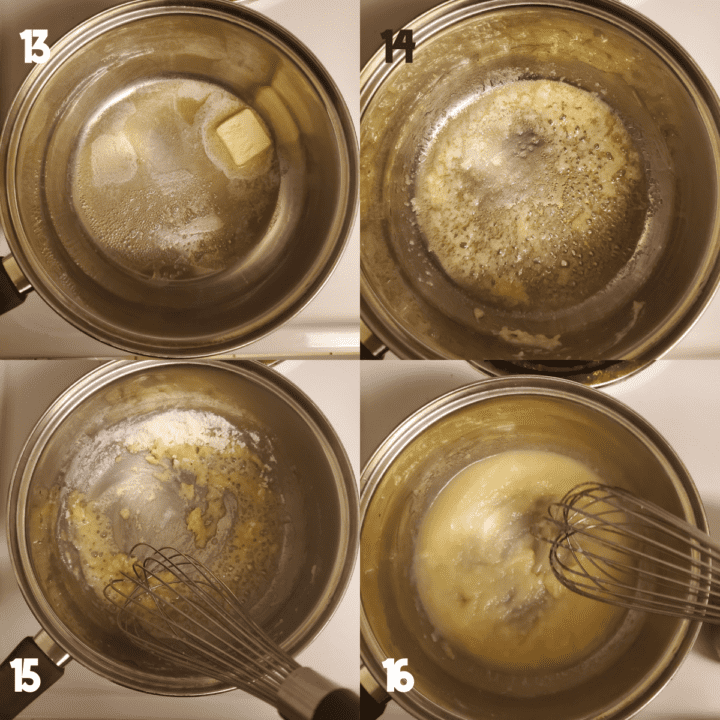
To the butter and garlic mixture, add the flour and whisk together. Cook for one to two minutes while constantly stirring. Slowly add in about one cup of chicken stock while continuing to whisk until smooth and incorporated. Allow the gravy to simmer on medium low and thicken for about five minutes. Season to taste with kosher salt, pepper and juice from half of a lemon.
How do you know when a roasted chicken is done cooking? The absolutely best and most foolproof way to tell the roasted chicken is done cooking is by checking the internal temperature with a meat thermometer. Check the breast (at least 155 F) and the thigh (at least 175 F). Be sure to avoid the bone and check in a few spots!
However, if you don’t have a thermometer, another good check is to pull one of the thighs from the breast of the chicken. If the chicken is fully cooked the thigh should very easily separate from the rest of the chicken. This means the chicken thighs are at least 175 F internally.
How do you carve a spatchcocked chicken? There is no right way to carve a chicken in my opinion. However, if you need tips this video from Serious Eats featuring J. Kenji López-Alt demonstrates it really well. I like to cut up the different pieces (breast, thigh, legs) and then remove the bones for easy eating!
Hint: When placing the chicken in the oven, place the thighs toward the back of the oven where it’s hotter. This will help cook the thighs faster and not overcook the breast.
Substitutions
Can you use other vegetables? You can definitely choose other types of vegetables. Potatoes, carrots and onions are another favorite which I typically do for the BBQ glazed chicken dinner. Leeks, brussels sprouts, cauliflower, sweet potatoes, mushrooms are all good options if you’re not interested in baby bok choy and green beans. Cooking time for the vegetables may vary if you make substitutions.
What’s a good substitute for baby bok choy? My typical grocery store almost always has it but I recognize that sometimes you need to find a substitute! If you can’t find it, you can try brussels sprouts. They are both part of the cabbage family. Just ma
Variations
One of the best things about roasted chicken is the versatility. The possibilities are endless for this recipe after you master the dry brine, spatchcock sheet pan method!
- BBQ glazed chicken sheet pan dinner with roasted potatoes, carrots and onions
- Make your own poultry seasoning and rub under the skin before roasting
- Chinese five spice with scallions and ginger
- Apples, cranberry and sage for a fall flavored roasted chicken
Equipment
What meat thermometers do you use? I use an alarm meat thermometer in the breast set to 155 F internal. The one I prefer is the DOT (affliate link) from thermoworks. In addition, I also use a thermapen (affliate link) to double check the internal temperature in various spots (breasts and thighs).
Do you have to use a cooking rack for this recipe? If you don’t have a rack, you can still make this recipe. The cooking rack allows for better air flow in the dry brine process. The rack also keeps the bottom of the chicken out of the chicken stock the vegetables are cooking in. Without a cooking rack, you may not be able to cook as many vegetables on the tray. To combat this, you can cook vegetables on a separate rimmed baking sheet with some chicken stock.
Top Tip
Share something here that you think is key to making this recipe well, such as: Don't overcook the If you need help spatchcocking the chicken, ask the store butcher to do it for you! But make sure you get to keep the spine for chicken stock.
Dry Brine Spatchcock Chicken Dinner
Ingredients
Chicken Sheet Pan Dinner
- 3-4 pound whole roasted chicken
- Diamond Crystal Kosher salt
- ½ pound baby bok choy
- ½ pound green beans trimmed
- 1 ½ - 2 cups chicken stock or broth
- 1-2 tablespoon canola oil
Gravy
- 1 tablespoon all purpose flour
- 1 tablespoon unsalted butter
- 1 tablespoon garlic paste or 2-3 cloves grated
- 1 cup chicken stock or broth
- Diamond Crystal Kosher salt to taste
- Freshly ground pepper to taste
- Fresh lemon juice to taste
Instructions
Spatchcock the Chicken
- Clean room in the fridge for a full sheet tray. Take out a sheet tray and oven safe cooking rack before starting.
- Take the chicken from the packaging, drain any juices and remove anything in the cavity. Place on your sheet tray and pat dry with paper towels. Arrange the chicken so that the backbone is facing you.
- Using sharp kitchen shears, remove the wingtips at the joint and save for stock. Starting at the bottom (where the legs are) make 1 cut on 1 side of the backbone. You’re going to cut through the ribcage but keep going towards the wings. Repeat on the other side of the spine until it’s removed. Save for stock!
- Open up the chicken and flip it over so the skin is on top. Press down on the top of the breast to break the breast bone, making the bird lay down flatter.
Dry Brine the Chicken
- Loosen skin from meat using your fingers or a spoon. Try to keep the skin intact as much as possible.
- Generously salt the entire chicken all over the meat and skin, you don’t want to skimp here at all as most of the salt will dissolve into the meat. Arrange the chicken so the breast is up and the legs and thighs are exposed on the oven safe cooking rack on a sheet tray.
- Allow to sit in the fridge, uncovered for at least 4 hours, preferably overnight but up to 48 hours. If you don’t have time to allow it to dry brine, you can proceed to the next section.
Roasting the Chicken and Vegetables
- When you’re ready to cook the chicken, preheat the oven to 450 F and place a rack in the middle of the oven.
- Cut all the baby bok choy in half lengthwise and wash well in water. Add to a large mixing bowl. Trim all green beans and add to the same large mixing bowl.
- Add 2 teaspoons of canola oil to the vegetable, toss and lightly salt to taste with kosher salt.
- Take the chicken out of the fridge on the sheet tray and cooking rack. Remove the cooking rack and chicken from the sheet tray and set aside. The chicken skin should look dried out, this is exactly what you want. If you see any moisture on the chicken, pat dry with a paper towel.
- Next, add the greens to the sheet tray that you used to dry brine the chicken, trying to keep the baby bok choy cut side down and arrange in a single layer.
- Add the cooking rack (with the chicken) on top of the vegetables so the chicken sits above the vegetables.
- Take the remaining amount of canola oil and generously rub the chicken skin with it, getting into all the nooks and crannies. This will help you get well browned chicken skin.
- If using, insert your alarm thermometer probe into the breast. Make sure you aren’t hitting any bone and the thermometer is deep into the breast. Set the temperature alarm to 155 F.
- Place the entire sheet tray into the oven, with the thighs and legs toward the back (this part of the oven is hotter). Carefully, add 1 ½ cups of chicken stock to the vegetables, just covering the bottom of the tray and cook for 25 minutes.
- After about 25 minutes, check the level of chicken stock and add ½ cup of the chicken stock if it has evaporated.
- Cook the chicken until the alarm sounds or for about 15-20 minutes more (40-45 minutes total). Check the internal temperature for the breast to be around 155 F and the thighs to be about 175 F. If you’re not using a thermometer, skin should be brown and the thigh/leg should very easily pull away from the chicken. Cook in 5 minute increments until the leg falls off easily.
- The vegetables are done when tender and most of the chicken stock should be evaporated, if not allow them to cook for 5-10 minutes or until tender while the chicken rests.
- Allow the chicken to rest for at least 10 minutes after it has finished cooking before carving.
Making the Gravy (Optional)
- While the chicken is resting, it is a great time to make the chicken gravy. In a medium saucepan, over medium low, melt the butter until foamy. Add in garlic and cook for 30 seconds to 1 minute until fragrant, be sure to keep stirring so it doesn’t burn.
- To the butter and garlic mixture, add the flour and whisk together. Cook for 1-2 minutes while constantly stirring.
- Slowly add in about 1 cup of chicken stock while continuing to whisk until smooth and incorporated.
- Allow the gravy to simmer on medium low and thicken for about 5 minutes. Season to taste with kosher salt, pepper and juice from ½ of a lemon. (Add more salt if it isn’t flavorful!)
Serving
- Carve roasted chicken into pieces as desired (breast, thighs, legs) and plate.
- Serve vegetables and any juices left over on the side.
- Serve roasted chicken pieces with gravy if desired.
Notes and Accommodations
- Ideally you should dry brine at least overnight but you can skip it, do 4 hours or up to 48 hours.
- Save the backbone and wingtips for stock making.
- Dry brine chicken uncovered on an oven safe cooking rack and sheet tray.
- Use an oven safe cooking rack that keeps the chicken above the vegetables.
- A meat thermometer is the best way to tell if a whole chicken is done cooking.
- If you’re checking the doneness of the chicken without a meat thermometer, look to see if the thigh pulls away easily with little resistance and the skin is golden
- Allow chicken to rest for at least 10 minutes before carving to keep it juicy.
- Gravy is optional but delicious.
Food Safety
- Cook to a minimum temperature of 165 °F (74 °C) (Chicken will carry over to this temperature)
- Do not use the same utensils on cooked food, that previously touched raw meat
- Wash hands after touching raw meat
- Don't leave food sitting out at room temperature for extended periods
- Never leave cooking food unattended
- Use oils with high smoking point to avoid harmful compounds
- Always have good ventilation when using a gas stove